The AST is designed to supply data input to an AORTA-R (AORTA Receiver) module (see [1], [2] and [3]); in fact the output data transmitter part of the AST is a copy of the AORTA-T (AORTA Transmitter) module [1].
The AST's 32Kx9 bits FIFO can be filled with data by a VME-master; by setting the proper 'mode' this data can be made to circulate (the data items sent on the optical link is also reentered into the FIFO), and thus a continuous output datastream can be generated.
Two types of data items can be distinguished : data tokens (with their 9th databit equal to 0) and control tokens (with their 9th databit equal to 1). The AORTA-R V2 prototype (AORTA Receiver Version 2) ([2], [3]) is capable of detecting these control tokens; the user can thus insert markers into the AST's output datastream, and detect them at the receiving end (interrupts may be generated).
The AST can be set in a mode ('event'-mode) where it stops outputting data after it has sent a control token.
In addition the AST contains two counters and two corresponding preset registers: the Transfer Counter (TC) and the Circulate Counter (CC); they are countdown counters and can be used to control the number of bytes sent by the AST.
Both the TC and CC count down from a preset value set by the user in the preset registers; the TC is decremented by one for each token passed to the AORTA-T; when the TC reaches zero the CC is decremented by one and if CC is not zero, the TC is reloaded with the preset value; the AST stops outputting data at TC reaching zero or both TC and CC reaching zero, depending on the mode of operation.
Figure 1 shows a functional block diagram of the AST.
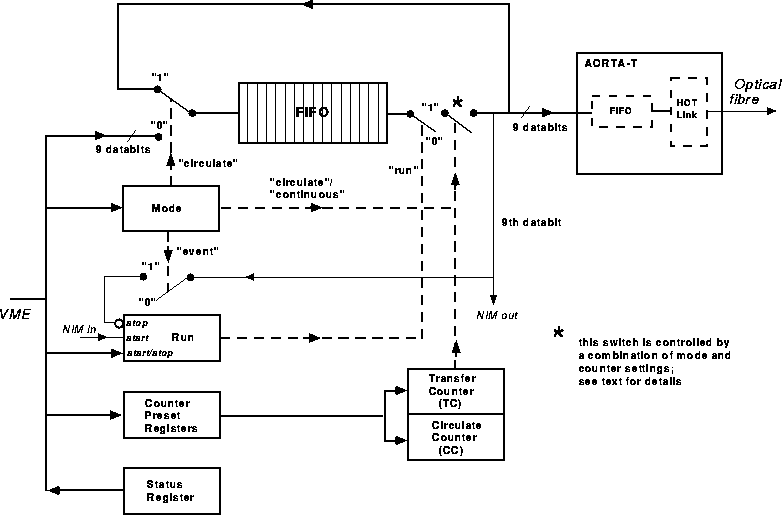
Figure 1: Functional block diagram of the AST.
A general procedure to set up and start the AST is as follows:
The different stages of the procedure are described in the subsections of chapter 2.4.